Saturday, November 12, 2011

Get the Facebook Timeline RIGHT NOW!!


So, Facebook has revolutionized our social networking life. And it has been up-to-date with some awesome features like the 'Video Chat'. Facebook has introduced a host of new features and the most awaited one has to be the Timeline , which streamlines your Facebook account to give you a one stop view for all your activities you’ve gone on Facebook every since you’ve started to use it. Sounds great right, it is, but, Timeline is open just for developers for now.

What can you do to get the Facebook Timeline?
Simple become a Facebook developer, I know it sounds weird , but YES, become a developer, you would question, you don’t know, anything about development on Facebook. That is the the time when u stop and look at Technoholics!
When you have your Timeline, this is how it would look like,

So,Here are the steps to get your own Timeline:
1. Log in to Facebook.

3. On the Top of the screen you would see something called as APPS, click on that or go to https://developers.facebook.com/apps

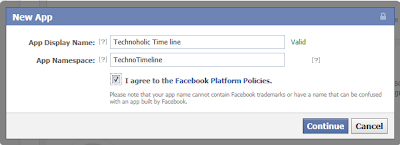
4. Create a New App, Enter anything you wish in App Display Name and App Namespace, hit continue, enter the Captcha, Read through and agree to the Platform Privacy agreement. This is the step you need to be verified for.


5. Ensure you’re in your new app’s main settings screen. You should see your app’s name near the top of the page.

6.  Look for the “Open Graph” header, and click the “Get Started using open graph” link.

7. Create a test action for your app, like “watching” a “technoholic blog”, or “eat” a “ice-cream” (Any-thing you like)


8. This should drop you into an action type configuration page. Change a few of the default settings (You can do any thing you like as you aren't using the app), and click through all three pages of settings and hit the Save Changes and Next button.

9.  Wait 2-3 minutes

10. Go to Facebook, An invite to try Timeline should be waiting at the top of the page

11. Hit the Get it Now Button.

12. Take a screenshot, upload it on Facebook, Flaunt it man!


Feel free to give your feedback at:
feedback@technoholics.co.in


Thursday, November 3, 2011

Members Posting Enabled

Now you can also share your information with us just go and submit it in the members post form.
Post Now!!

Saturday, October 29, 2011

Increase Your Net Speed upto 20% by Registry Tweaking


I received many mails and request saying my net speed in slow any suggestions or how to increase my net speed well this post will not increase your net speed greatly but it would have a considerable effect...

1) log on as Administrator.
2) start - run - type gpedit.msc
3) expand "local computer policy"
4) then expand "administrative templates"
5) then expand "network branch"
6) Highlight the "QoS Packet Scheduler"
7) on right window double click "limit reservable bandwidth"
8) on setting tab check the "enabled"
9) change "Bandwidth limit %" to 0

Give a reboot and you are done.


Feel free to give your feedback at:
feedback@technoholics.co.in

Friday, October 28, 2011

Celebrating Our 1st Anniversary!!


Feel free to give your feedback at:
feedback@technoholics.co.in
Friday, October 7, 2011

How To Save Videos From YOUTUBE! & many more without any downloader.


1] Launch your browser and play the video till its entirely buffered.
2] Close the browser or the tab in which the video was buffered.
3] Visit your browser’s cache location: ex. If you use Google Chrome then (C:\Documents and Settings\[user name]\Local Settings\Application Data\Google\Chrome\User Data\Default\Cache)
(For other browsers just check your browser’s cache location after: {C:\Documents and Settings\[user name]\Local Settings\Application Data\[according to your browser]})
4] Right click and arrange icons by modified.
5] The last file is your video.
6] Rename the file and give it a “ .flv “ extension.
7] You’re done. Enjoy the saved video.
Note- Copy that file to your desired location, as the cache memory is temporary memory. So if you copy that file to another location it makes the file permanent.


Feel free to give your feedback at:
feedback@technoholics.co.in

Saturday, September 3, 2011

Hidden Text in an Image

Step 1: Copy an image file to c: of your computer.

Step 2: Copy the text(which you want to hide) to clipboard, by writing it in notepad and selecting it,
            right clicking it, then copy.

Step 3: Open cmd, by going to Start => All Programs => Accessories => Command Prompt.

Step 4: In cmd type :
            cd \
            echo “your text to hide” >> “image.jpg”.

Step 5: Now right click on image.jpg => Open with => Notepad. You can see your hidden text at the end
           of your image file contents.

Feel free to give your feedback at:
feedback@technoholics.co.in

Friday, August 26, 2011

Gmail motion BETA

A new way to communicate!!
The mouse and keyboard were invented before the Internet even existed. Since then, countless technological advancements have allowed for much more efficient human computer interaction. Why then do we continue to use outdated technology? Introducing Gmail Motion -- now you can control Gmail with your body.


Feel free to give your feedback at:
feedback@technoholics.co.in

Saturday, August 20, 2011

Making a Virtual Operating System


I know most of us have tried to make a dual boot and have faced problems. So today i'm introducing you to a very interesting software VMWare Workstation which would allow us to make a virtual operating system without a dual boot and a headache.


Why Choose VMware Workstation?

From the creator of PC virtualization comes the most reliable, secure way to run multiple operating systems at the same time. Winner of more than 50 industry awards, VMware Workstation transforms the way technical professionals develop, test, demo, and deploy software. VMware Workstation is an integral component of any serious technical professional’s toolkit. Run Your Most Demanding Applications on the Most Advanced Virtualization Platformcontinue reading...(actual website link)


Feel free to give your feedback at:
feedback@technoholics.co.in

Friday, August 19, 2011

Windows XP Hidden Programs


For each of these programs, launch it by:
"Start" >> "Run", then type the executable name and press Enter.

Program: Clipboard Viewer (Access contents of Windows Clipboard)
Executable: clipbrd


Program: Dr. Watson for Windows (Trouble Shooting tool)

Executable: drwtsn32

Program: DirectX diagnosis (Diagnose DirectX, video & sound components)
Executable: dxdiag

Program: Private character editor (Create your own characters)
Executable: eudcedit

Program: IExpress Wizard (Create self-extracting / self-installing package)
Executable: iexpress

Program: Mcft Synchronization Manager (Synchronize network files to for off-line work)
Executable: mobsync

Program: Windows Media Player 5.1 (the basic version of Media Player)
Executable: mplay32

Program: Object Packager (Create packages to insert to a file)
Executable: packager

Program: System Monitor (A very useful tool to monitor PC performance)
Executable: perfmon

Program: Network shared folder wizard (creates shared folders on network)
Executable: shrpubw

Program: File signature verification (Verify signature on files)
Executable: sigverif

Program: Account Database Security Tool (Warning! this tool might encrypt all user accounts)
Executable: syskey

Program: Driver Verifier Manager (Verify the device drivers)
Executable: verifier

Program: Built-in Windows Chat (Windows for Workgroups Chat)
Executable: winchat


Feel free to give your feedback at:
feedback@technoholics.co.in

Monday, August 15, 2011

This Independence Day make your computer speak along with you!!


This Independence Day make your computer speak along with you the praises for our Beloved Nation...

Open notepad type the following text :

CreateObject("SAPI.SpVoice").Speak"I Love My India!!!"

and save it as ilovemyindia.vbs

*
to change the contents it says just change the words in the double quotes


Feel free to give your feedback at:
feedback@technoholics.co.in

Sunday, August 14, 2011

How to use Pendrive as Ram and increase PC speed

‎1. First Go To Control Panel from my computer or startup
2. Then click on System And Security and then System .
3. Now click on "Advance System Settings" at left side
4. Click on Settings and the go to Advanced Tab and then Settings > Advanced
5. Now, you can see Virtual Memory, just click on Change
6. Here you have to uncheck "Automatically manage paging file size"
7. Now, click on your pen drive, and set the custom size.
8. Ex. In 4 GB pen drive, 700 is initial size and 3000 is maximum size

Feel free to give your feedback at:
feedback@technoholics.co.in

Saturday, August 13, 2011

General Keyboard Shotcuts


  1. CTRL+C (Copy)
  2. CTRL+X (Cut)
  3. CTRL+V (Paste)
  4. CTRL+Z (Undo)
  5. DELETE (Delete)
  6. SHIFT+DELETE (Delete the selected item permanently without placing the item in the Recycle Bin)
  7. CTRL while dragging an item (Copy the selected item)
  8. CTRL+SHIFT while dragging an item (Create a shortcut to the selected item)
  9. F2 key (Rename the selected item)
  10. CTRL+RIGHT ARROW (Move the insertion point to the beginning of the next word)
  11. CTRL+LEFT ARROW (Move the insertion point to the beginning of the previous word)
  12. CTRL+DOWN ARROW (Move the insertion point to the beginning of the next paragraph)
  13. CTRL+UP ARROW (Move the insertion point to the beginning of the previous paragraph)
  14. CTRL+SHIFT with any of the arrow keys (Highlight a block of text)
  15. SHIFT with any of the arrow keys (Select more than one item in a window or on the desktop, or select text in a document)
  16. CTRL+A (Select all)
  17. F3 key (Search for a file or a folder)
  18. ALT+ENTER (View the properties for the selected item)
  19. ALT+F4 (Close the active item, or quit the active program)
  20. ALT+ENTER (Display the properties of the selected object)
  21. ALT+SPACEBAR (Open the shortcut menu for the active window)
  22. CTRL+F4 (Close the active document in programs that enable you to have multiple documents open simultaneously)
  23. ALT+TAB (Switch between the open items)
  24. ALT+ESC (Cycle through items in the order that they had been opened)
  25. F6 key (Cycle through the screen elements in a window or on the desktop)
  26. F4 key (Display the Address bar list in My Computer or Windows Explorer)
  27. SHIFT+F10 (Display the shortcut menu for the selected item)
  28. ALT+SPACEBAR (Display the System menu for the active window)
  29. CTRL+ESC (Display the Start menu)
  30. ALT+Underlined letter in a menu name (Display the corresponding menu)
  31. Underlined letter in a command name on an open menu (Perform the corresponding command)
  32. F10 key (Activate the menu bar in the active program)
  33. RIGHT ARROW (Open the next menu to the right, or open a submenu)
  34. LEFT ARROW (Open the next menu to the left, or close a submenu)
  35. F5 key (Update the active window)
  36. BACKSPACE (View the folder one level up in My Computer or Windows Explorer)
  37. ESC (Cancel the current task)
  38. SHIFT when you insert a CD-ROM into the CD-ROM drive (Prevent the CD-ROM from automatically playing)
  39. Dialog Box Keyboard Shortcuts
  40. CTRL+TAB (Move forward through the tabs)
  41. CTRL+SHIFT+TAB (Move backward through the tabs)
  42. TAB (Move forward through the options)
  43. SHIFT+TAB (Move backward through the options)
  44. ALT+Underlined letter (Perform the corresponding command or select the corresponding option)
  45. ENTER (Perform the command for the active option or button)
  46. SPACEBAR (Select or clear the check box if the active option is a check box)
  47. Arrow keys (Select a button if the active option is a group of option buttons)
  48. F1 key (Display Help)
  49. F4 key (Display the items in the active list)
  50. BACKSPACE (Open a folder one level up if a folder is selected in the Save As or Open dialog box)

    Microsoft Natural Keyboard Shortcuts
  51. Windows Logo (Display or hide the Start menu)
  52. Windows Logo+BREAK (Display the System Properties dialog box)
  53. Windows Logo+D (Display the desktop)
  54. Windows Logo+M (Minimize all of the windows)
  55. Windows Logo+SHIFT+M (Restore the minimized windows)
  56. Windows Logo+E (Open My Computer)
  57. Windows Logo+F (Search for a file or a folder)
  58. CTRL+Windows Logo+F (Search for computers)
  59. Windows Logo+F1 (Display Windows Help)
  60. Windows Logo+ L (Lock the keyboard)
  61. Windows Logo+R (Open the Run dialog box)
  62. Windows Logo+U (Open Utility Manager)

    Accessibility Keyboard Shortcuts
  63. Right SHIFT for eight seconds (Switch FilterKeys either on or off)
  64. Left ALT+left SHIFT+PRINT SCREEN (Switch High Contrast either on or off)
  65. Left ALT+left SHIFT+NUM LOCK (Switch the MouseKeys either on or off)
  66. SHIFT five times (Switch the StickyKeys either on or off)
  67. NUM LOCK for five seconds (Switch the ToggleKeys either on or off)
  68. Windows Logo +U (Open Utility Manager)

    Windows Explorer Keyboard Shortcuts
  69. END (Display the bottom of the active window)
  70. HOME (Display the top of the active window)
  71. NUM LOCK+Asterisk sign (*) (Display all of the subfolders that are under the selected folder)
  72. NUM LOCK+Plus sign (+) (Display the contents of the selected folder)
  73. NUM LOCK+Minus sign (-) (Collapse the selected folder)
  74. LEFT ARROW (Collapse the current selection if it is expanded, or select the parent folder)
  75. RIGHT ARROW (Display the current selection if it is collapsed, or select the first subfolder)

    Shortcut Keys for Character Map, After you double-click a character on the grid of characters, you can move through the grid by using the keyboard shortcuts
  76. RIGHT ARROW (Move to the right or to the beginning of the next line)
  77. LEFT ARROW (Move to the left or to the end of the previous line)
  78. UP ARROW (Move up one row)
  79. DOWN ARROW (Move down one row)
  80. PAGE UP (Move up one screen at a time)
  81. PAGE DOWN (Move down one screen at a time)
  82. HOME (Move to the beginning of the line)
  83. END (Move to the end of the line)
  84. CTRL+HOME (Move to the first character)
  85. CTRL+END (Move to the last character)
  86. SPACEBAR (Switch between Enlarged and Normal mode when a character is selected)

    Microsoft Management Console (MMC) Main Window Keyboard Shortcuts
  87. CTRL+O (Open a saved console)
  88. CTRL+N (Open a new console)
  89. CTRL+S (Save the open console)
  90. CTRL+M (Add or remove a console item)
  91. CTRL+W (Open a new window)
  92. F5 key (Update the content of all console windows)
  93. ALT+SPACEBAR (Display the MMC window menu)
  94. ALT+F4 (Close the console)
  95. ALT+A (Display the Action menu)
  96. ALT+V (Display the View menu)
  97. ALT+F (Display the File menu)
  98. ALT+O (Display the Favorites menu)

    MMC Console Window Keyboard Shortcuts
  99. CTRL+P (Print the current page or active pane)
  100. ALT+Minus sign (-) (Display the window menu for the active console window)
  101. SHIFT+F10 (Display the Action shortcut menu for the selected item)
  102. F1 key (Open the Help topic, if any, for the selected item)
  103. F5 key (Update the content of all console windows)
  104. CTRL+F10 (Maximize the active console window)
  105. CTRL+F5 (Restore the active console window)
  106. ALT+ENTER (Display the Properties dialog box, if any, for the selected item)
  107. F2 key (Rename the selected item)
  108. CTRL+F4 (Close the active console window. When a console has only one console window, this shortcut closes the console)

    Remote Desktop Connection Navigation
  109. CTRL+ALT+END (Open the Microsoft Windows NT Security dialog box)
  110. ALT+PAGE UP (Switch between programs from left to right)
  111. ALT+PAGE DOWN (Switch between programs from right to left)
  112. ALT+INSERT (Cycle through the programs in most recently used order)
  113. ALT+HOME (Display the Start menu)
  114. CTRL+ALT+BREAK (Switch the client computer between a window and a full screen)
  115. ALT+DELETE (Display the Windows menu)
  116. CTRL+ALT+Minus sign (-) (Place a snapshot of the active window in the client on the Terminal server clipboard and provide the same functionality as pressing PRINT SCREEN on a local computer.)
  117. CTRL+ALT+Plus sign (+) (Place a snapshot of the entire client window area on the Terminal server clipboard and provide the same functionality as pressing ALT+PRINT SCREEN on a local computer.)

    Microsoft Internet Explorer Navigation
  118. CTRL+B (Open the Organize Favorites dialog box)
  119. CTRL+E (Open the Search bar)
  120. CTRL+F (Start the Find utility)
  121. CTRL+H (Open the History bar)
  122. CTRL+I (Open the Favorites bar)
  123. CTRL+N (Start another instance of the browser with the same Web address)
  124. CTRL+O (Open the Open dialog box, the same as CTRL+L)
  125. CTRL+P (Open the Print dialog box)
  126. CTRL+R (Update the current Web page)
  127. CTRL+W (Close the current window)

    Feel free to give your feedback at:
    feedback@technoholics.co.in

Wednesday, August 3, 2011

Predator


PREDATOR locks your PC when you are away, even if your Windows session is still opened. It uses
a regular USB flash drive as an access control device,and works as follows:
  • you insert the USB drive
  • you run PREDATOR (autostart with Windows is possible)
  • You do your work
  • when you're away from your PC,you simply remove the USB drive:
  • once it is removed, the keyboard and mouse are disabled and the screen darkens
  • when you return back to your PC, you put the USB flash drive in place:
  • keyboard and mouse are immediately released, and the display is restored

PREDATOR FAQ CLICK HERE!!
CLICK HERE TO DOWNLOAD!!

*external link no guarantee of the site administrators!!

Feel free to give your feedback at:
feedback@technoholics.co.in


Saturday, July 30, 2011

Confidential Folder Hider!!


Download the file attached here. When you’ll double click on the FolderLock.bat file for first time, a folder “Confidential” will be automatically created. You can move all your confidential data in that folder.

Now to lock the folder just double click on the file “Key”. You will get a confirmation message in Command Prompt. Type “y” to confirm. Now the folder “Confidential” will be locked and hidden.

If you want to access the contents of the folder then again double click on the batch file, you have created. Immediately you will be prompted to enter your password the default password is "default123". After that you can access the folder “Confidential”. If you want to change the password right click on the FolderLock.bat file n then find the text "default123" and change it to the password you want.
WORKS ON BOTH XP AND WINDOWS7.

Feel free to give your feedback at:
feedback@technoholics.co.in